Coding a simple module bundler 📦
Let's understand how module bundlers work under the hood 🤔

I am a computer science undergraduate at IIIT Guwahati.
Ever wondered how create-react-app or vue-cli convert large source code into build files? They use module bundlers like webpack and rollup to bundle the source code into some distributable chunk files. In this blog, we will learn how module bundlers work under the hood by coding a simple one.
A module bundler is a tool that takes pieces of JavaScript and their dependencies and bundles them into a single file.
Let's create a source folder (src) containing our source code with index.js as the entry point and message.js as a utility dependency.
src/index.js
import {message} from "./message.js";

console.log(message);
src/message.js
export const message = `Hello, Ravindra`
Here, index.js is responsible for printing a message (imported from message.js).
tring! tring! we have dependencies 🔗 here - and now we need to bundle 🎁 it in a single file, how do we do it?
Let's create a function that will do it for us. For that, we will create a bundler.js that will take the entry point(src/index.js) as input and throw out the bundled file(build.js) as an output.
Essentially, we need to start with the index.js file and collect all the dependencies(by looking at the import statements) and create a dependency graph and then bundle it using BFS.

Getting dependencies of a file
To get all the dependencies of a file we will create a function createAsset that will take the file name as an argument and return the dependencies.
function createAsset(filename){
    // read and store the file content(as a UTF-8 string)
    const content = fs.readFileSync(filename, 'utf-8');

    // create an AST using babel
    const ast  = babel.parseSync(content, {
        parserOpts: { allowReturnOutsideFunction: true },
    });

    // dependencies basket
    const dependencies = [];

    // traverse through the AST and collect the import statements in the basket
    traverse(ast, {
        ImportDeclaration: ({ node }) => {
            dependencies.push(node.source.value);
        }
    })

    return dependencies
}
Read more about AST and AST explorer, node readFileSync API, babel and babel parseSync.
Let's test it...
const assets = createAsset("./src/index.js");
console.log(assets);
Output:

And we have all the dependencies from the index.js in an array
Creating a dependency graph
Similarly, we can run createAsset on all the dependencies and further as well, which will give us a dependency graph. So, we will create a function createGraph which will do this for us.
Since the tree has to be traversed in a BFS order we will use a queue to store the dependencies(Graph nodes).
Before implementing the createGraph method we will revamp the createAsset function to return some more information regarding the dependency modules.
let ID = 0;

function createAsset(filename){
    // read and store the file content(as a UTF-8 string)
    const content = fs.readFileSync(filename, 'utf-8');

    // create an AST using babel
    const ast  = babel.parseSync(content, {
        parserOpts: { allowReturnOutsideFunction: true },
    });

    // dependencies basket
    const dependencies = [];

    // traverse through the AST and collect the import statements in the basket
    traverse(ast, {
        ImportDeclaration: ({ node }) => {
            dependencies.push(node.source.value);
        }
    })

    const id = ID++;

    // piping the code through the babel loader, which will convert the code(ES5+) to browser compatible code.
    const { code } = babel.transformFromAstSync(ast,content, {
        presets: [
            "@babel/preset-env"
        ]
    });


    return {
        id, // unique module id (for creating the mappings, and tracking the already included ids, sort of unique node value)
        code, // the parsed and transpiled code from the file
        filename, // filename
        dependencies // all the dependencies
    }
}
Read more about babel transformFromAstSync.
And now is the time for createGraph function
function createGraph(entry){
    // Extracting the initial(index.js) dependencies
    const mainAsset = createAsset(entry);

    // Initializing the queue
    const queue = [mainAsset];

    // Traversing through the queue, until it gets empty
    for(const asset of queue){
        const dirname = path.dirname(asset.filename);

        asset.mapping = {};

        asset.dependencies.forEach(relativePath => {
            const absPath = path.join(dirname, relativePath);

            const child = createAsset(absPath);

            asset.mapping[relativePath] = child.id;

            queue.push(child);
        })
    }

    return queue;
}
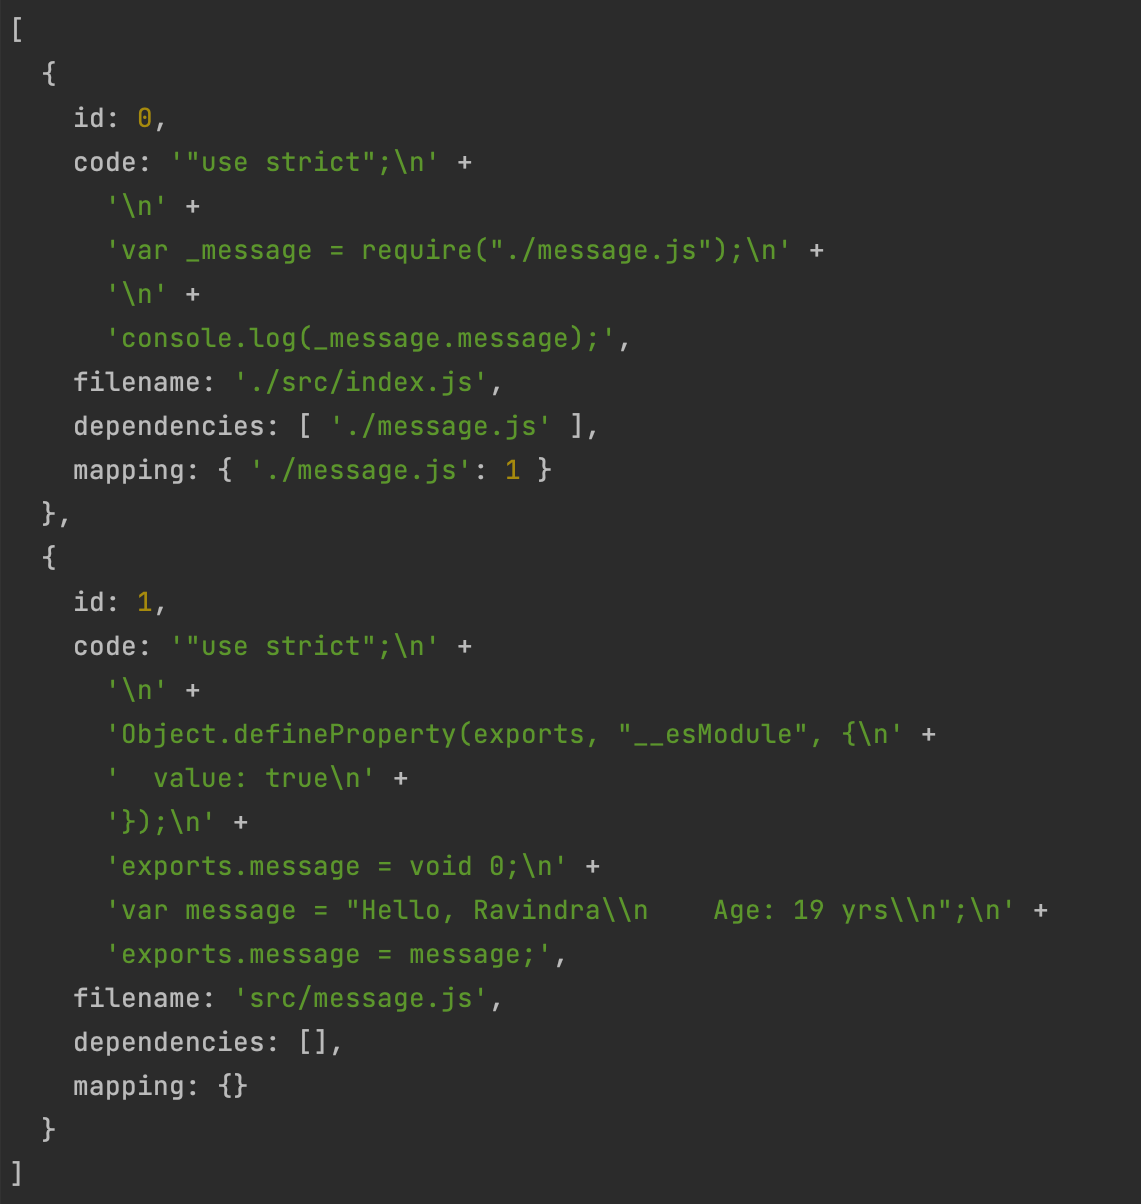
Now, let us test it...
const graph = createGraph("./src/index.js");
console.log(graph)
and, it prints the list of modules(nodes) and their dependency mapping(edges)
Bundling dependencies
We will create a function bundle which will take the graph obtained from the createGraph function and return the bundled code.
function bundle(graph){
    let modules = ``;

    graph.forEach(mod => {
        modules += `${mod.id}: [
            function(require, module, exports){
                ${mod.code}
            },
            ${JSON.stringify(mod.mapping)}
        ],`
    })

    const result = `
        (function(asset){
            function require(id){
                const [fn, mapping] = asset[id];

                function localRequire(relativePath){
                    return require(mapping[relativePath]);
                }

                const module = { exports: {} };

                fn(localRequire, module, module.exports);

                return module.exports;
            }

            require(0);
        })({${modules}})
    `;

    return result;
}
Now, let's test it
const graph = createGraph("./src/index.js");
const result = bundle(graph);
fse.outputFile("build.js", result);
It will output a build.js consisting of bundled code.
Furthermore, we can compress our code using uglifyJS before writing it to the build.js like this.
const graph = createGraph("./src/index.js");
const result = bundle(graph);
fse.outputFile("build/bundle.js", uglifyJS.minify(result).code);
The result is a build.js file

And if I run this file - node build.js

Wooohooooo🥳, it worked, now we can directly serve this single javascript file. This was a very very basic implementation of the module bundlers.
Check out the source https://github.com/ravvis/mini-bundler
Some resources to learn more about module bundlers
https://www.youtube.com/watch?v=UNMkLHzofQI
https://www.youtube.com/watch?v=Gc9-7PBqOC8
https://www.youtube.com/watch?v=gEBUU6QfVzk
https://lihautan.com/what-is-module-bundler-and-how-does-it-work/
https://www.freecodecamp.org/news/lets-learn-how-module-bundlers-work-and-then-write-one-ourselves-b2e3fe6c88ae/
Do share your thoughts in the comment section. 🌻
